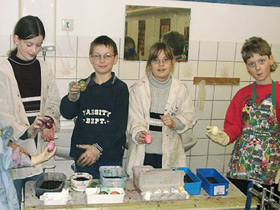
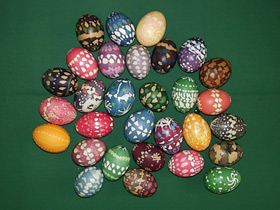
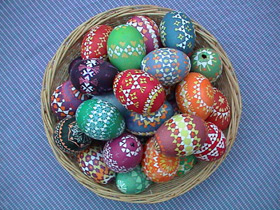
The Sorbs are the members of a Slavonic minority in Saxony and Brandenburg who are living in the Lausitz. The Sorbs who are a group of about 60,000 people descend from Slavs who have lived in today's eastern Germany and western Poland already since the 7th century. The decoration of Easter eggs goes back to centuries-old customs and can today be seen as artistic handicrafts.
The wax must be heated up, until it is liquid (not permit to boil!) Take a blown out egg for trying.
With the feather cut into shape (or the pin-head) you dip into the wax. Be careful, it's hot! Nevertheless you must work rapidly, because the wax hardens fast.
Press now the feather (or pin-head) with the wax on the egg and take it fast off again. Repeat this procedure until an ornamentation develops from the individual stamp forms.
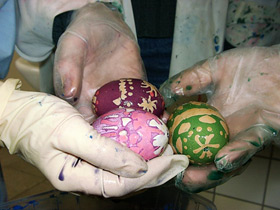
Subsequently you dip the egg into colour for colouring Easter eggs (do not forget the vinegar!). The best is to wear thin rubber gloves.So you get an egg which has at the end an ornament in the colour of the egg and which has otherwise the coloured colour. You can bring several layers of wax on the egg. The wax ornaments always produce thereby the previous colour as ornamentation.
The last colouring colour will be the final colour of the egg and the ornaments will have the colours of the previous colouring (in the selected order). Consider to begin always with the brighter colours.
When the egg is dried well the wax can be removed with the help of a hot air pistol or in the baking-oven with 150°C.
At the end you polish the egg carefully with a soft cloth so that it shines a bit.
Your Theresa

 1. I cut the upper ends of chicken feathers or quills into different forms.
2. I put a small and a large pin into two pencils.
3. I mix beeswax and white candle wax in equal parts.
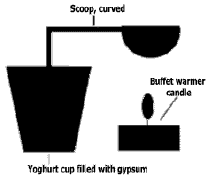
4. I bend an old scoop or a large spoon and fasten it for example in a yoghurt cup with gypsum.
5. I warm up the wax with a buffet warmer candle and keep attention that the wax does not boil.
 6. I dip the feather or the pin into the liquid wax and make the ornament on the egg. I take the stamp fast off from the egg, so that the wax does not become too solid.

 7. First I colour the egg in a bright colour. Under the wax there remains the white colour of the egg.
8. When the colour is dry I can make the second layer of wax on the first colour film.

 9. I can repeat the procedure laying wax on – colouring several times.
 10. Only after the last colouring procedure I remove the wax in the baking-oven or with the hot air pistol and the coloured ornament will appear.
| You need:: |
|
The wax must be heated up, until it is liquid (not permit to boil!) Take a blown out egg for trying.
With the feather cut into shape (or the pin-head) you dip into the wax. Be careful, it's hot! Nevertheless you must work rapidly, because the wax hardens fast.
Press now the feather (or pin-head) with the wax on the egg and take it fast off again. Repeat this procedure until an ornamentation develops from the individual stamp forms.
Subsequently you dip the egg into colour for colouring Easter eggs (do not forget the vinegar!). The best is to wear thin rubber gloves.So you get an egg which has at the end an ornament in the colour of the egg and which has otherwise the coloured colour. You can bring several layers of wax on the egg. The wax ornaments always produce thereby the previous colour as ornamentation.
The last colouring colour will be the final colour of the egg and the ornaments will have the colours of the previous colouring (in the selected order). Consider to begin always with the brighter colours.
When the egg is dried well the wax can be removed with the help of a hot air pistol or in the baking-oven with 150°C.
At the end you polish the egg carefully with a soft cloth so that it shines a bit.
Your Theresa
Detailed step-for-step guidance
 1. I cut the upper ends of chicken feathers or quills into different forms.
2. I put a small and a large pin into two pencils.

3. I mix beeswax and white candle wax in equal parts.
4. I bend an old scoop or a large spoon and fasten it for example in a yoghurt cup with gypsum.
5. I warm up the wax with a buffet warmer candle and keep attention that the wax does not boil.
 6. I dip the feather or the pin into the liquid wax and make the ornament on the egg. I take the stamp fast off from the egg, so that the wax does not become too solid.

 7. First I colour the egg in a bright colour. Under the wax there remains the white colour of the egg.
8. When the colour is dry I can make the second layer of wax on the first colour film.

 9. I can repeat the procedure laying wax on – colouring several times.
 10. Only after the last colouring procedure I remove the wax in the baking-oven or with the hot air pistol and the coloured ornament will appear.


